Saturday, December 24, 2022

SUSTAINING OUR CULTURAL HERITAGE - ARTipolo Group Partnered with National Commission for Indigenous People (NCIP-MIMAROPA)

On 24th of December 2022, ARTipolo Group visited the office of NCIP Region 4B (MIMAROPA) to discuss 2023's project collaboration. Both parties have the same interest, which is to protect and promote the rights of the indigenous cultural communities. The indigenous people (IP) communities sustained our local culture and creative legacies despite the massive influences brought in by Chinese, Spaniards, Americans, and other nationalities that came to our land. Other than that, they have tilled and protected many of our frontiers and natural resources - national parks and tourist spots.


The provinces of Mindoro, Marinduque, Romblon, and Palawan make up MIMAROPA. There are 21 Indigenous People Communities in these provinces. The 21 IPs' cultures, goods, and means of subsistence will be highlighted and presented by NCIP-MIMAROPA and ARTipolo in several events and exhibitions. The major goal of the project is to assist them in figuring out how to market their goods and services to eco-tourists. The first collaboration would happen on March 2023 by participating in an international event called "Green Travel Mart" which was initiated by Dr. Mina Gabor.  Other than ARTipolo, there will be other partners and collaborators, but the beneficiaries would be the IPs of MIMAROPA.

The meeting was attended by representatives from ARTipolo's board and NCIP-MIMAROPA. From ARTipolo, present during the meeting are Mr. Pol Mesina, Jr. (ARTipolo President), Mr. Mark Joseph Belloria, Ms. Eleanor Habal Robleza, and Ms. Mary Rose Gob. From NCIP-MIMAROPA, it was attended by Regional Director Mary Grace Pascua, Doc Din Mabanta, and Engr. Ysmael Fontanilla.

Action plans were drafted, and succeeding meetings will seal this partnership.  During the said meeting, RD Pascua awarded ARTipolo with the coffee table books published by NCIP.  These will serve as references for the artists to capture the essence of MIMAROPA's 21 indigenous communities through paintings and other visual forms of art.  If you are interested to avail the series of coffee table book, you may contact NCIP at https://ncip.gov.ph/, and inquire about Project Epanaw - The Journey of Our Indigenous Peoples.


It was indeed a fruitful discussion and it paved the way for more ideas and events that would support the indigenous people.  Hopefully, as we join hands together, we will be able to document our cultural heritage for the benefit of the next generations.

We welcome comments for ideas and volunteers if you are interested to be part of similar projects.

Saturday, October 22, 2022

AFFORDABLE SATURDAY ART CLASSES - MEET OUR CASCADE KIDS

I woke up excited this Saturday morning as this would be the very 1st Face-to-Face Saturday Art Classes that we will have since 2019.  We were supposed to launch the 1st class on March 2019, but pandemic occur.  We were not able to launch our school and the author just continued developing programs and learning materials for our website.  You will find useful lessons through our Free Art Lesson tab.  
Learning on your own, without a mentor or someone to critique your work is difficult.  As a learner, you would appreciate the guidance of an art teacher.  Though art maybe innate for our children, having a teacher speeds up the process of learning.
We always wanted to develop the skills of children and adults in creative arts.  But many of the offered classes are quite expensive.  And so we tried to trim down the cost of having a class by taping our friends to share their abode as venue for classes.  Luckily, Ms. Leslie Esternon helped us by opening her doors for our learners.  
The families or the parents will also spend more buying art materials.  But as a learned artist, we know that it is very essential to understand our materials first before we buy expensive branded products when we can secure less expensive art materials through bulk orders.  This is one of our strategies to lower the cost of the classes.  Thus, as part of our two-days session, we already added the handouts, drawing materials and the 2-days workshop session at Leslie's place.  
The first live class started on October 22, 2022, 2 p.m. until 4 p.m.  We had 10 students, four of which are teenagers and six are from age 8 to 10 years old.  The younger children are guided by Ate Rose and the teens are guided by Lolo Rey.  It was fun and they were given assignments so that they will be able to learn practice what they learned.  Here are some of the shots for the 1st day...


Thursday, October 13, 2022

ARTipolo's Participation in SILANGAN: The Rizal Art Fair 2022

 Calling all Art Enthusiasts and Collectors.  On 12 October 2022, Wednesday, the ARTipolo Group once again showcased the works of their members as they participated in an art fair entitled "Silangan - The Rizal Art Fair 2022", along with other groups based in the province of Rizal.  

ARTipolo called upon their active members to submit two (2) pieces of size 12" X 12" paintings depicting their impressions of the town of Antipolo.  There were 40 participating artists whose names are as follows:

1. Alexandra Monserrat                            21. Jessica Casaljay 2. Amador Inlayo                                      22. JM Guzik 3. Aminah C. Sioson                                 23. John Mark Navarro 4. Aris Ventures                                        24. Krister Isip 5. Ber Nardo                                             25. Liana Mariz P. Mesina 6. Celes 'Onit ' Untalan                           26. Marge DC Gomez 7. Cha M. Baladjay                                 27. Maria Len len Moriones 8. Charmaine Marie De Chavez               28. Marie Claire 9. Chrisellie C. Guzik                               29. Marj Sula - Aquino 10. Corazon Gaufo Patarata                       30. Mark Joseph Beloria 11. Crishaira PeliƱo - Bode                        31. Mary Rose Gob 12. Daphne Lagunay                                  32. Mathilda Sula Sun 13. Dea Solis                                              33. Michelle Diwa 14. Diane Cabas                                         34. Nelson Dela Cruz 15. Dyna Quizon Ondoy                            35. Nelson Medina 16. Eleanor Habal Robleza                        36. Pol A. Mesina , Jr 17. Jae Zyril Contridas                              37. Rodgie Gapayao 18. Jayson Z. Borlon                                 38. Rymer Gengoni 19. Jenella L. Medina                                39. Vivian Nocum Limpin 20. Jerry Y. Contridas                                40. Yurika Palmones

Despite the massive number of entries, ARTipolo was able to piece together the works and created a larger collage of colors. The collection looked like a mural and these pieces may be bought as a bundle or one can even choose among those on display to design their residences with sights and images depicting Antipolo City.

Each artist closely looked at subjects that best fits the theme of the group. You will see Antipolo's native delicacies and food like kasoy and suman; endemic plant like the Tipolo leaves where the group's logo is patterned; as well as beautiful maidens garbed in the locale costume. To give you a peek, we have attached photos of the exhibit below. But it is still best to see it in person.

The exhibit "Silangan" will run from October 12 to 30 at SM Angono. Viewing is free and all paintings are available for sale. You may immediately bring home the bought masterpieces. Run now before it gets taken away!


Tuesday, September 27, 2022

Featuring: PAKIGANGAY 2 at Blanco Art Museum

It was a privilege to be part of the 2nd show of "Pakigangay" at The Blanco Art Gallery.  “PAKIG-ANGAY 2: in the Province of Rizal” is a joint exhibit of ARTipolo Group, Inc. of Antipolo, Rizal and BAGHID Eastern Visayas Young Artists Association of Calbayog, Samar, September 01 - 30, 2022.

Pakigangay stands for interdependence or sharing.  The theme fits well the cooperation of three groups as we hold this meaningful event.  It shows how we embraces fellow artists belonging to BAGHID, ARTipolo and with the support of TBAG.

Prior to the event opening, ARTipolo sponsored youths of BAGHID, to have a lakbay-aral sort of exposure to the different galleries and art exhibits around Rizal provinces.  ARTipolo seasoned artists also held some workshops and art camp for the youths of Samar.  They had a meaningful and insightful experiences.

The Blanco Art Gallery also showcased some of the works of BAGHID, along with entries of ARTipolo group.  The opening cited the contributions of each group and awarded the youth representatives of BAGHID certificates of appreciation.  There were small group contest as well, and the event became a celebration of each groups' artistry.

My entry to the said exhibit is the flying lady, which hold a golden apple as she goes after the flying leaves of the holy scriptures.  I entitled the said work "Palabras del Oro", which means Golden Words.  It's size is 24 inches by 18 inches.  It shows how one escapes the pull of worldly pleasures that soon becomes causes of worries and stress.  Through the scriptures she finds freedom and comfort.

Please see the rest of the exhibit at TBAG Gallery 3, The Blanco Art Gallery (part of the Blanco Family Museum) #312-B A. IbaƱez St., Brgy. San Vicente, Angono, Rizal, Philippines.


Tuesday, August 30, 2022

FREE ART LESSON #7: Portraiture or drawing faces: Freehand Drawing (Simple and Easy to follow steps)

 We had a three-day vacation last Saturday until Monday (August 27 to 29, 2022).  We went to a place where there's no data or wifi, and the cottage that we rented have no TV programs.  What we have are open cabanas, videoke, and a large pool.  We indeed enjoyed our stay and was able to relax because there's no internet that would occupy us, so we spent so much time bonding with family members.

This was my output during the said outing

Whenever I don't feel like swimming, I spent time doing freehand drawing.  And so our topic for today, is how you can draw a portrait, without having rulers, or grid lines but just a reference.  This approach is a freehand drawing.  Usually, if there are no scales, it is quite difficult to find where to place the parts of a face.  But with this simple guide of using circles, and shapes, you'll find it easy to draw faces.  


I have included a video at the latter part of this article.  I promised the video owner, https://www.youtube.com/c/ChommangDrawing, that I'll acknowledge him.  Check out his channel and you'll get useful tutorials on drawing.

STEP-BY-STEP INSTRUCTION ON DRAWING FACES

This will be our reference photo:


   Step 1:  First, draw a circle, which is our guide for the upper portion of the face.  If you will visualize a skull, the upper part of the head is spherical in shape. 


 Step 2:  Now find the location of eyes, nose and lips.  Cut horizontally the circle by placing a very light line.  This will be the upper lid of the eyes or where you place the brows.  If your reference picture is looking sideways, about 45 degrees, then the vertical line guide for the nose would be about 1/3 of the circle.  Draw two smaller circles for the eyes socket and a slim pear-shaped for the nose.  Take note, the end of the nose may be very close to the lower outline of the circle. 


Draw the lower shape of the face, which is the chin.  The mid line of this shape would be the place for the mouth.  Draw a line at the mouth's opening, and the upper lip and lower lip to follow.  

You may now proceed with erasing some parts of the head that you feel is not needed; determine now the exact shape of the face by outlining with heavier marks.
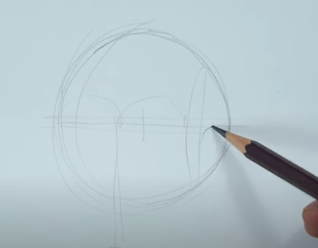
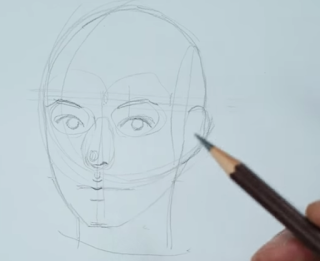
 Since one ear is showing, draw its outline.  Usually, the upper part of the ear starts under the brows and ends at the end of the nose.


Step 3:  Proceed with detailing.  Draw the eyes as to how you see it.  Followed by the nose and lips.  If you are distracted with the references, you can erase it as soon as you are able to achieve the exact shapes and details of the face.


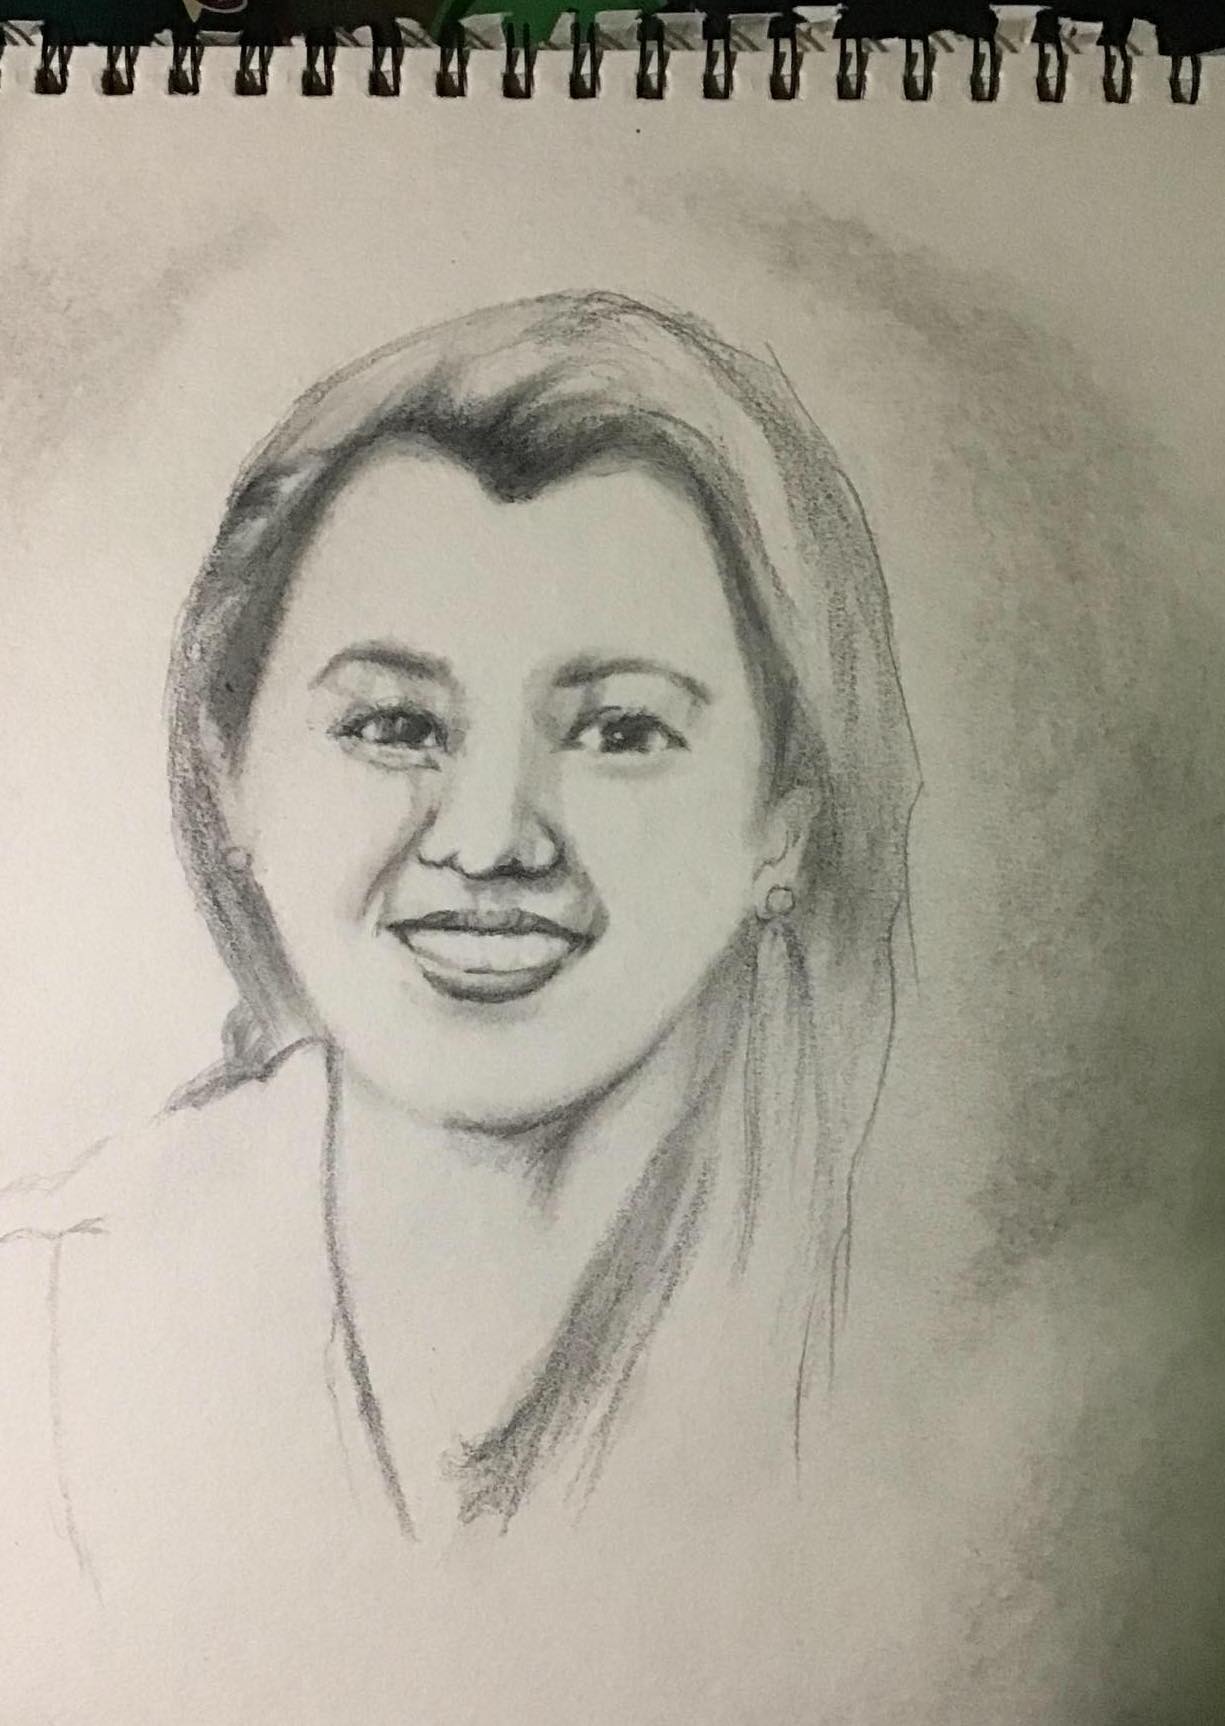
 It is not necessary that you follow the guidelines as you draw.  If you feel that there are slight changes to make it look exactly as the photo, do change the parts.  It is advisable that you draw using light stroke first before you finalized the lines or parts of your drawing.

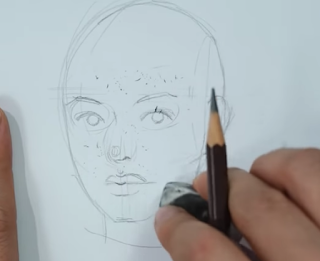
 For the hair, find the center where the hair parted.  Usually, the hair flows out of the sphere borders.  Use curves as to how the hair flows out.  Do not shade it yet.

 When you are able to fine the details, you may now use darker and heavier strokes for finishing the face outlines.


Step 4:  Shading - Now that you see how the face appears, erase all sketches or guides and clean up the face.  Then shades the eyes, lips, hair and other shadows.  Get the exact hue of shades so as to develop a 3D appearance or to put life to your drawing.  Highlights can be achieved by lifting out shades using your eraser.


Watch the video below to see how it's being done by the artist.  We hope you learned from this free tutorial.  Please like or follow and share to your friends.  


Thursday, July 21, 2022

Free Art Lessons #6: How to do Charcoal Portraits?

 I have visited my uncle's wake and I was reunited with my cousins.  As we did some catching up with one another, I shared my blog.  It was great to hear encouragement from families.  Along our journey as artist or learning to become one, we may encounter challenges which may bring your enthusiasm down.  Don't be!  Find friends and family members to share your passion for arts.

When I arrived home, I searched for raw materials that I have edited and worked on it.  So here goes our free lesson on art -- How to make charcoal portraits?

Here are the materials that you will need:

  • Granite pencil (HB or even ordinary pencils will do)
  • Drawing paper (The thicker one. I uses a sketch pad 160 g/m2
  • Charcoal pencils
  • Sand paper
  • Kneaded eraser
  • Dry brush with medium soft bristles
  • Paper Stump Spreader

Step 1.  In the following video, you will see that I already made a sketch using granite pencil.  Start drawing first the feature of the face as have been taught on previous topics. 

Step 2.  When you already have a sketch of the face, we will proceed with shadowing using the paper stump spreader and a powdered charcoal pencil.  First, prepare the powdered charcoal.  Get a sand paper and rub on it the lead of the charcoal pencil.  You don't need to transfer the powder on new containers.  What I do is once there's enough powder on the sandpaper, you may start shadowing by dipping your paper stump on the powder lightly.

Step 3.  With light pressure, you may start spreading the charcoal using the paper stump spreader. My tip is that you start with the main features like the eyebrows, eyes, nose, and lips, then work your way out to the shape of the face.  Don't start with the hair yet because it will need a lot of charcoal and you may mess up your drawing as the charcoal sticks to the palm of your hands.

Step 4.  For the lighter parts of the face, use dry brush to spread charcoal coming from what you have placed on the drawing.  I don't dip my brush on the powder charcoal.  I just use it to spread what has been placed on the paper.

Step 5.  For highlights, use your kneaded eraser to lift off some lead from the drawing.  You can shape your kneaded eraser to create finer details.  Do not rub heavily so as not to destroy the paper.


Step 6.  For wider parts and less detailed parts of your portrait, you may use your fingers to spread the charcoal.  Do it lightly and do not rub it heavily on the paper.  Also, make sure that your hands are clean and free of oil or water.

Step 7.  For the final details, for parts that must be well defined, you may use your sharpened charcoal pencil to draw over finer lines i.e. lashes or nose line.

Watch the video above for the demo.  It is in Filipino but there's an English subtitle.  

If you liked this article, please like or share to your friends and families.  Or if it is not of much trouble, please like my youtube channel.  You may also send your comments in the comment section or send me your request for more featured art tutorials or art lessons.  


Have a great day!


Saturday, June 11, 2022

It's S-ART-urday!!! (Basic requirements in painting - Brushes)

Hello young artists, art enthusiasts, fellow artists and art aspirants.  I hope you are looking forward to another creative Saturday Art activity.

I have to work on two (2) paintings, one commissioned and the other is already purchased.  I just wanted to improve the latest before delivery to its new home.   I started cleaning my corner studio (because it is just a mini space in our garage) and got inspired by a hashtag I've thought of at the spur of the moment ---  it is #sARTurday.


WELCOME TO MY MICRO-STUDIO! šŸ˜

As many of my friends know, I have a regular work from Monday to Friday and it's only during weekends and holidays that I get to do my painting.  Since the pandemic, I was not able to devout time building on the first initiative that we started when we had our CartWheel exhibit.  Now that the pandemic has been lifted, I see hope to continue this endeavor so that we can share our talents.

So now, every Saturday, we will have art moments.  Maybe I can start sharing lessons learned every Saturday, and how I pursue my art interest.  If you wish to join me, you can subscribe to my blog and you'll receive updates below.  We can also have 30 minutes #sARTurday sessions or art classes via zoom.  I'll prepare my studio, the lessons and the time so that it'll be at the most convenient time.  We invite Filipino children, as the medium of our classes would be in "Filipino" or "Tagalog".  Are you joining?  If yes, please send me a message using the "contact form for inquiries" found at the bottom of this page.

I am continuously learning as an artist.  I watch videos that would help me improve.  For today, let me  share this video by Kevin Hill, which I think would be helpful in starting up as an acrylic painter.  Then later, I will share as well what I did so that you can apply it at a smaller scale.  You've already seen my studio above as I shared with you my space which serves as my studio, my collection of brushes, and acrylic paints.  You don't need a large area to become an artist.  We need our hearts to be bigger that our excuses.  

If you don't have adequate time to complete this video, you may click on the timestamp below to watch where you left at.  

1:17 oils vs acrylics - 3:40 Difference in bristles - 5:20 Easels - 6:30 Palettes - 7:34 Colors explained - 8:55 Spending time learning - 9:35 How to setup - 11:40 plein air painting - 12:00 Cleaning - 14:45 Mediums - 17:28 Varnish - 18:02 Palette knife - 18:19 Underpainting techniques - 19:05 Sketching - 19:50 acrylic over oil paint - 20:30 Canvases - 23:43 Not making mud - 25:20 Complementary colors & warm & cool colors colors - 26:58 Color mixing practice - 28:00 mistakes - 29:10 painting ideas - 30:27 perspective - 31:35 selling paintings - 32:50 the biggest challenge


ACRYLIC BRUSHES

At 3:40 of the video above, we have seen the different bristles. Let me share the brushes I use in doing acrylic painting.

Flat Blender Brush

I uses this flat blender brush for layering and blending soft acrylic paints.  Sometimes, keeping it dry, I uses it for softening top paint and for glossing mists and fogs in landscape painting. 
Flat Brushes
There are two (2) kinds of flat brushes I use.  One is with soft bristle and the one on top is with stiff bristle.  I uses this to create natural textured paint on landscapes or still life.  You can use these in spreading, and tapping paint on canvas.  Sometimes I uses the one above as dry brush for blending acrylic colors.

Pointed Rounded Brush

These brushes are ideal for creating petals, leaves, and even fine edges for trees or houses.  It stores a lot of paint on its bristles, thus ideal for tapping and pulling paint over the canvas.

Fan Brush

I have two (2) different sizes of fan brushes.  When working on large paintings, I uses the larger one.  But most of the time, I uses the smaller one.  Usually, I uses these for creating textured grasses.  It is originally designed to create texture.  However, when it is too wet, it clumps together.  Just ready a rag to wipe out excessive liquid when clumping happens.


Angled Filbert Brush

These brushes are suited to create close-up tree leaves, flowers, tall grasses, tree limbs, etc. Its angled bristles can be used to create many different angles, for almost endless brush stroke possibilities. 

Mop brush (black fibre) and stiff flat brush (green)

The Mop brush has larger bristles with a rounded edge for broad soft paint application as well as for getting thinner glazes over existing drying layers of paint.  By using this, it will not damage the lower layers of paint.  The flat stiff brush is ideal for creating thinner lines when run using the thinner side, or larger flat spread of paint.


Micro fiber filbert brushes

These are the smallest fibre brushes which I use for detailing.  These are perfect for final touches, example detailing close up tree leaves to flowers, seascapes and just about anything else. 

Custom Liner

The custom liner creates fine lines.  I usually use these when creating barks or branches of tree or pulling lines to create benches, walls, or just anything.  It carries a lot of paint and doesn't splatter when used.


Watch this to see how brushes are used.


Did you learn something today?  I hope you did!  Please do share your thoughts and keep our passion burning! 
    Rose Gob


About Rose Gob

My photo
Hello! Thank you for reading my blog. I am Rose Gob, a Knowledge Management expert, a seasoned HR and OD practitioner, an artist and an educator by heart. I have created three (3) blogs to share articles in the field of creative arts, cooperative, social enterprise industry. But among these blogs, I write more for my art blog, www.cascadeartstudio.com. During the pandemic, I was able to populate my blogs with various topics. But now, I realized that I need to focus. I hope you will give me feedback for topics that you want to learn. Send me questions and I'll try my best to answer your questions. Again, thank you for reading and please do check my blogs often. Have a great day!