Showing posts with label Gallery 4 DRAWINGS. Show all posts

Saturday, October 22, 2022

AFFORDABLE SATURDAY ART CLASSES - MEET OUR CASCADE KIDS

I woke up excited this Saturday morning as this would be the very 1st Face-to-Face Saturday Art Classes that we will have since 2019.  We were supposed to launch the 1st class on March 2019, but pandemic occur.  We were not able to launch our school and the author just continued developing programs and learning materials for our website.  You will find useful lessons through our Free Art Lesson tab.  
Learning on your own, without a mentor or someone to critique your work is difficult.  As a learner, you would appreciate the guidance of an art teacher.  Though art maybe innate for our children, having a teacher speeds up the process of learning.
We always wanted to develop the skills of children and adults in creative arts.  But many of the offered classes are quite expensive.  And so we tried to trim down the cost of having a class by taping our friends to share their abode as venue for classes.  Luckily, Ms. Leslie Esternon helped us by opening her doors for our learners.  
The families or the parents will also spend more buying art materials.  But as a learned artist, we know that it is very essential to understand our materials first before we buy expensive branded products when we can secure less expensive art materials through bulk orders.  This is one of our strategies to lower the cost of the classes.  Thus, as part of our two-days session, we already added the handouts, drawing materials and the 2-days workshop session at Leslie's place.  
The first live class started on October 22, 2022, 2 p.m. until 4 p.m.  We had 10 students, four of which are teenagers and six are from age 8 to 10 years old.  The younger children are guided by Ate Rose and the teens are guided by Lolo Rey.  It was fun and they were given assignments so that they will be able to learn practice what they learned.  Here are some of the shots for the 1st day...


Tuesday, August 30, 2022

FREE ART LESSON #7: Portraiture or drawing faces: Freehand Drawing (Simple and Easy to follow steps)

 We had a three-day vacation last Saturday until Monday (August 27 to 29, 2022).  We went to a place where there's no data or wifi, and the cottage that we rented have no TV programs.  What we have are open cabanas, videoke, and a large pool.  We indeed enjoyed our stay and was able to relax because there's no internet that would occupy us, so we spent so much time bonding with family members.

This was my output during the said outing

Whenever I don't feel like swimming, I spent time doing freehand drawing.  And so our topic for today, is how you can draw a portrait, without having rulers, or grid lines but just a reference.  This approach is a freehand drawing.  Usually, if there are no scales, it is quite difficult to find where to place the parts of a face.  But with this simple guide of using circles, and shapes, you'll find it easy to draw faces.  


I have included a video at the latter part of this article.  I promised the video owner, https://www.youtube.com/c/ChommangDrawing, that I'll acknowledge him.  Check out his channel and you'll get useful tutorials on drawing.

STEP-BY-STEP INSTRUCTION ON DRAWING FACES

This will be our reference photo:


   Step 1:  First, draw a circle, which is our guide for the upper portion of the face.  If you will visualize a skull, the upper part of the head is spherical in shape. 


 Step 2:  Now find the location of eyes, nose and lips.  Cut horizontally the circle by placing a very light line.  This will be the upper lid of the eyes or where you place the brows.  If your reference picture is looking sideways, about 45 degrees, then the vertical line guide for the nose would be about 1/3 of the circle.  Draw two smaller circles for the eyes socket and a slim pear-shaped for the nose.  Take note, the end of the nose may be very close to the lower outline of the circle. 


Draw the lower shape of the face, which is the chin.  The mid line of this shape would be the place for the mouth.  Draw a line at the mouth's opening, and the upper lip and lower lip to follow.  

You may now proceed with erasing some parts of the head that you feel is not needed; determine now the exact shape of the face by outlining with heavier marks.
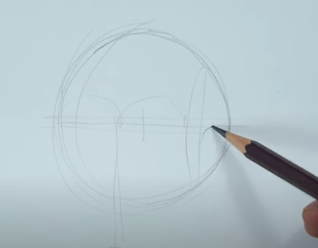
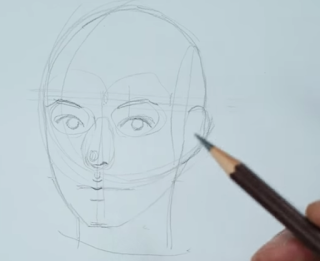
 Since one ear is showing, draw its outline.  Usually, the upper part of the ear starts under the brows and ends at the end of the nose.


Step 3:  Proceed with detailing.  Draw the eyes as to how you see it.  Followed by the nose and lips.  If you are distracted with the references, you can erase it as soon as you are able to achieve the exact shapes and details of the face.


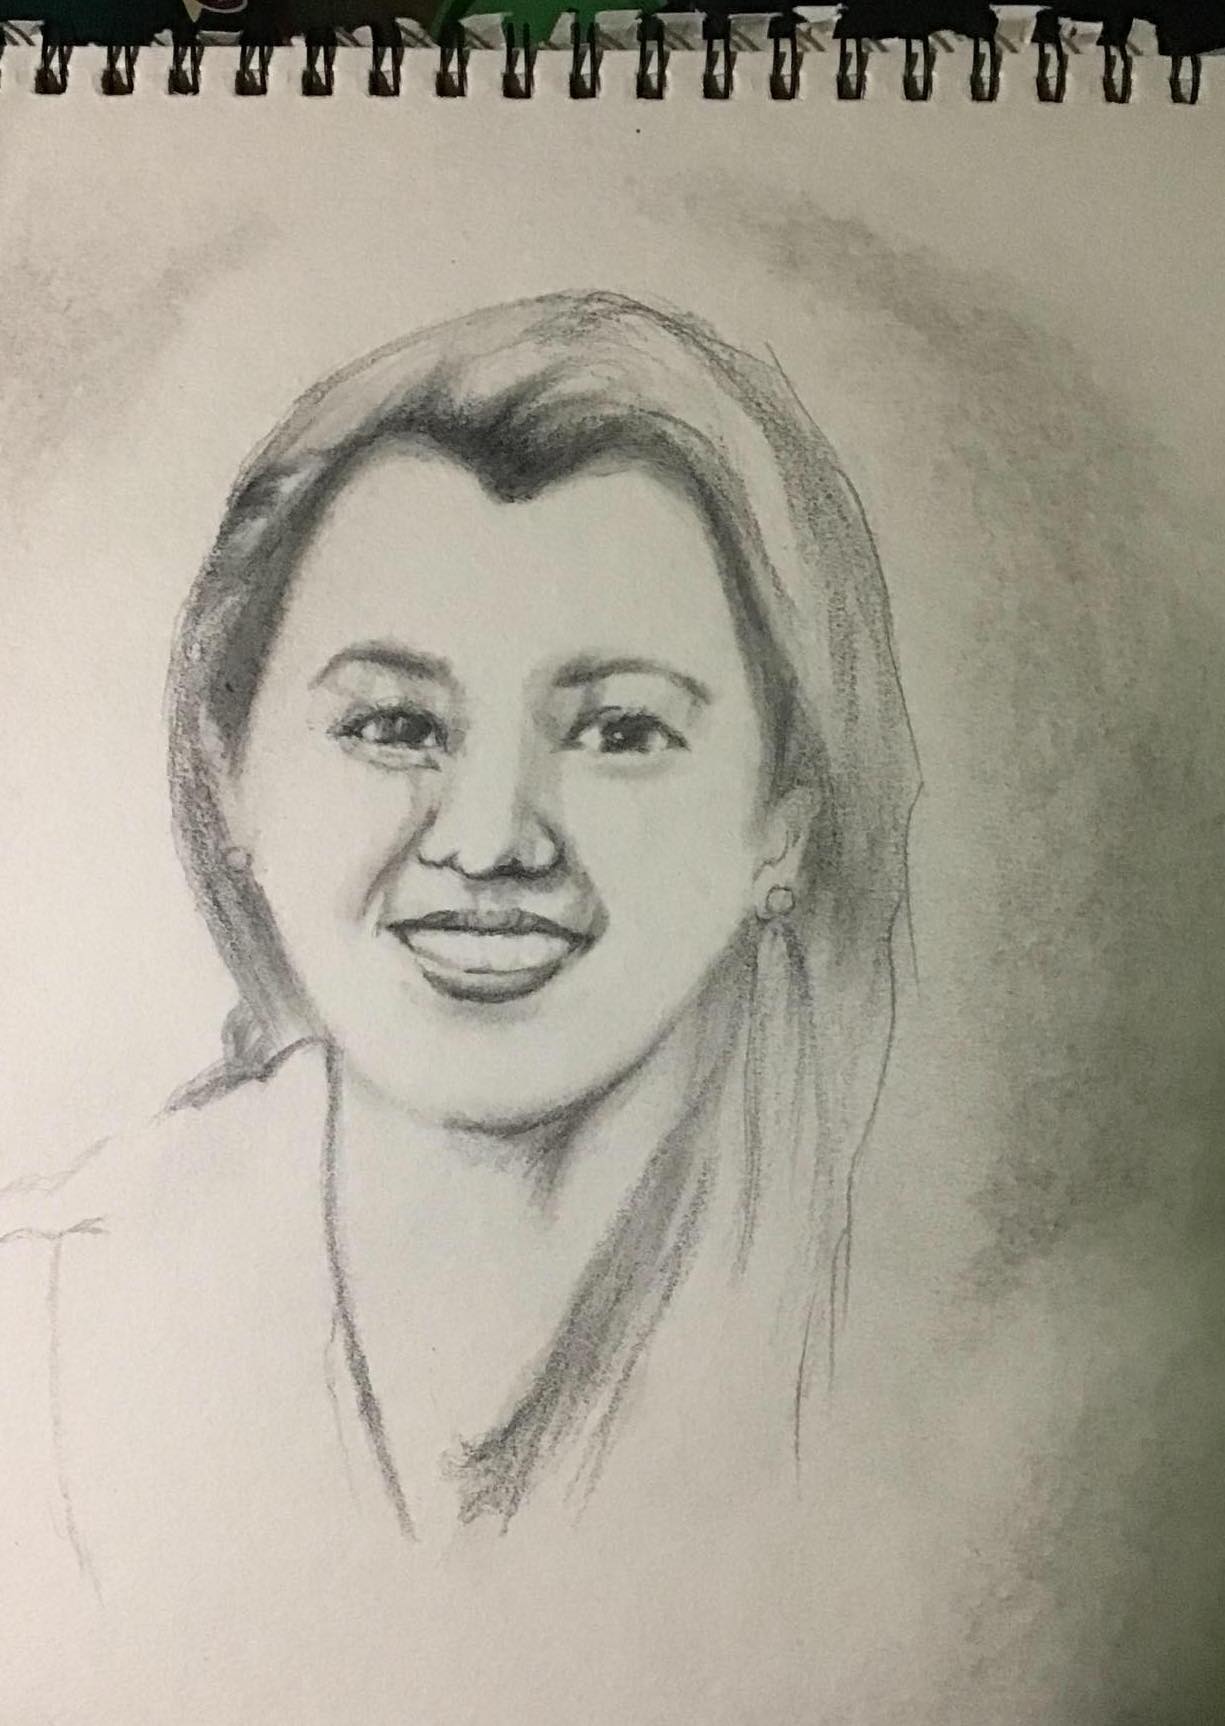
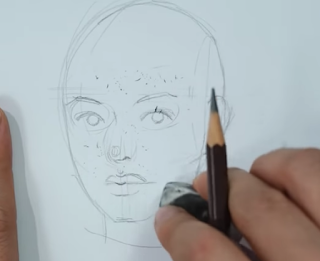
 It is not necessary that you follow the guidelines as you draw.  If you feel that there are slight changes to make it look exactly as the photo, do change the parts.  It is advisable that you draw using light stroke first before you finalized the lines or parts of your drawing.

 For the hair, find the center where the hair parted.  Usually, the hair flows out of the sphere borders.  Use curves as to how the hair flows out.  Do not shade it yet.

 When you are able to fine the details, you may now use darker and heavier strokes for finishing the face outlines.


Step 4:  Shading - Now that you see how the face appears, erase all sketches or guides and clean up the face.  Then shades the eyes, lips, hair and other shadows.  Get the exact hue of shades so as to develop a 3D appearance or to put life to your drawing.  Highlights can be achieved by lifting out shades using your eraser.


Watch the video below to see how it's being done by the artist.  We hope you learned from this free tutorial.  Please like or follow and share to your friends.  


Friday, July 23, 2021

How to Draw Alive-Looking Eyes


If you want to learn how to draw faces and portraiture, one key to make it captivating and real is by drawing the eyes realistically or making it alive.  The eyes are windows to our soul or emotions.  Even through drawing, being able to draw a  captivating eye can change the appearance and impact of your work.

When I started learning how to draw portraiture, I practiced a lot on the eyes of the subject.  I experimented and finally, I learned how we can possibly draw alive looking eyes.  There are several materials online to learn how to draw beautiful looking eyes.  So I curated some here for different levels of learning.  

Remember, you will not grow if you don't practice.  So with these materials, I advise you get your tools and find a perfect place to start drawing.  

Drawing Eyes for Beginners

The following video illustrates an easy way of drawing eyes starting from a circle.  This video exhibits outlines and not much on shading.  Thus, as a beginner, you'll be able to produce eyes that may lack details.


Advance Art Tutorial - Drawing hyper realistic eye

The next video takes longer but the end product is much better.  This will teach you more details on shaping the eye and using the right amount of shading for pencil drawings. 


As you have seen from the video, you need to layer the shading starting from light to darkest.  To add more value and make it realistic, take notice of the highlights or how the artist lifted off some of the granite to reveal the white light.  Always consider where the light falls in your drawing.  Train your eyes to see the details of lighting.


Painting Realistic Eye

You may now have the urge to learn how to add colors to your artwork.  The following video is a time-lapse but would still give you idea on how to paint realistically looking eyes.  The medium used in this video is oil paint. Oil paint doesn’t dry quickly and needs longer time to finish. If you are going to use oil paint, you need to be patient and don’t rush your work.


Take notice of the process.  Different from using graphite, the artist started with dark background to build on the foundation of his painting.  Then little by little he layered the lighter colors and used fine brushes to shape and add volume to his painting.  The final touches uses tutanium white for highlights.  He also uses clean dry brushes for softening parts that he wanted to blend.  The good thing with oil paint is that you can blend colors well using linseed oil even after a day or two. The colors are brighter as well and blending is much easier compared to acrylic. When acrylic dries, you can no longer blend it.  With acrylic, you have to work on wet-on-wet.

After watching these videos, it inspires me to start working on my art.  I hope that through these materials, you are able to learn some tips on how you would work on your "Eyes".

Now here are other references related to this post:
* From Art Rocket  Easy Tips for Drawing Eyes
* From Marvin Todd's pin in Pinterest - Drawing Eyes

Sunday, February 14, 2021

Lesson 3: Different types of Shading.

 A simple drawing is lifeless and appears as one dimensional.  To give it a 3D or three dimensional look, we need to define where are the lights coming from and how does it falls on the object.  Then we need see where the shadows are.

In creating shadows on our objects, there are several types of shadows.  We have taught you about the hatching, thatching, and cross-thatching from previous posts.  Now, let us continue learning the other types of shadowing styles and let us practice by repeating what has been shown in the featured videos.

The first video that we will show is from the works of Ms. Lauren Arno.  She showed how to do the following:
  • Cross hatching
  • Hatching
  • Contour Shading
  • Scribbles
  • Strippling, and
  • Circular lines


The next video is an application of lighting on geometrical shapes by Bial-Art Art school. The video demonstrated well how one should look at the direction of the light and the volume of shadows to improve the appearance of the drawing.


LET'S PRACTICE DRAWING 
 Now, to improve our drawing techniques in drawing, let us look at the following drawings as our references. Follow the following steps in our practice drawing: 
STEP 1. Draw 6 circles in a bond paper or drawing paper 
STEP 2. Shade the 6 Circles based on the 6 shown kinds of shading below;
STEP 3. After doing the sphere shading, apply all types of shading based on what you learned to a pear. See the photo below.
Share your works by commenting on this post and stay tune for next featured free art lessons online.

See below other reference videos for practice:


Thursday, February 4, 2021

Sunday Online Practice Class on Drawing with Ink

 Hello readers! I was quite a while that we haven’t had a free art lesson.  This Sunday, February 7, 10 a.m., may I invite you to a free tutorial on drawing using ballpoint pens.  It will be online and we will use zoom for our meeting.  To join, please send me your e-mail address so I can send you the invites and link.  You may use the form below, left side for a private message or use the FB Chat pop-up at the right side of this blog.

Since we will be practicing, be ready with your pencil, ballpen and paper.  I will be using a reference but if you have a subject you wish to use other than what I will provide, you may do so.  This will be an exciting art session.  Ready with your drawing table and camera so I can check your works.

See you then!


Friday, May 8, 2020

LESSON 2: Sketching Inanimate Objects


Drawing Inanimate Objects

As of the afternoon of May 9, from 3:00 p.m. to 3:45 p.m., we had a live feed on our FB Page @CascadeArtStudio.  We continued with Lesson 2 of our Free Saturday Art Class while still on Enhanced Community Quarantine or ECQ.

For those unable to join or see the live feed, we have added it here in our blog for quick access and understanding for those who wish to learn how to draw. It may be for a hobby or to pass the time.  But I hope this article helps you relieve boredom or help you discover your potential in drawing.


MATERIALS NEEDED:

  • Drawing pencils
  • Drawing pad
  • Eraser
Let us start with our lesson.  

To draw inanimate objects, you must remember the different shapes. Drawing would be easy if you could identify shapes by looking at pictures.


Now to illustrate, let us use the following picture as a reference:


First, identify the complete shape of the object.  The 1st vase, it's a tall rectangle.  Add two perpendicular lines for the width of the vase mouth.  Then a horizontal line for the neck of the vase.  Now, for the body, you may use an oval shape to get its form.  

For the second vase, let us use a square to box in the object.  The same with the first vase; use two perpendicular lines to get the location and form of the vase's mouth.  The vase's body is like a circle or a lying egg shape. 

The third vase is very much the same as the 1st vase.  We used a red color to show you how it will overlap with the figure of the 2nd vase.


Now, let us transfer the shapes on paper.  Draw those lines and shapes from the above image on your drawing pad.


Using your reference, sketch in the shape of the vases, using the lines and shape as your guide.


When you can get the shapes of the vases, define them a little, then using the kneaded eraser, remove or erase all guidelines and shapes as shown in the image below.  Now, you have a drawing of the three vases.


With what we learned from our 1st lesson, let us work on detailing and defining the shadows.   From the original picture, where is the source of light?  From the left?  That is correct!  So the shadows should be placed on the right side of the image.


Work on the shadows.  From the figure below, I used hatching and cross-hatching.


Now that you have finished these drawings let us work on your assignments.  I will be posting 3 photos here.  Select one and work on it.

For those who will send me their output, I will feature it here.  To send your assignments, message me on my FB Page, CASCADE Art Studio.


ASSIGNMENT 1


ASSIGNMENT 2


ASSIGNMENT 3


Send me your work!  I'm excited to see it.  Thanks, and Keep Safe!


Thursday, April 30, 2020

CASCADE Studio's Free Basic Drawing On-line Workshop

With the Enhance Community Quarantine holding us all from going-out of our homes, it's fortunate that now we find time to draw and be creative.  Finally, we can now get our art materials and start sketching and drawing, a visual way of expressing our thoughts or recording the events in our surroundings through freehand drawing.

Mothers get to spend more time with their children and monitor their activities.  This is also an opportunity to explore if you, as a mother, (or for your children), have a talent to draw.  One mother contacted me through chat.  She was inquiring if I can give workshop through online. I told myself, why not?  I've been managing webinars since March 16, and was unable to hold my pencils and art materials because the webinars are eating most of my time.  It is good timing that this May 1, we are on holiday and May 2 falls on a Saturday.  With the long weekend ahead, I can now prepare the materials for drawing and patch it live on FB.


Thus, may we invite you on May 2, 10:00 a.m. to 11:30 a.m. for a workshop on basic drawing.  We will start with understanding the art materials and understanding the movements of light, and its significance to drawing.

With the live feed, I will be accepting 10 online students to be coached and mentored while we do an online feed via FB.  You may still be able to get a slot for the sample coaching in this online workshop.  Just get a ticket here and I'll send you the Google Meet link to take part.

The requirements is if you are using a celfone, be sure to download the Google Meet Application.  If you are using laptop or desktop, then you just have to click on the invite that will be sent to you.

For the art materials:


See the complete lessons and the video on my next blog.  Enjoy!!!


Wednesday, December 2, 2015

Kuya... Hyeong... Older Brother


This was an assignment for oil pastel art. I thought of drawing our "Kuya Daniel" because it would be easy to draw someone you cared for.  He has taught me a lot of things and learned how to look at the world in colorful perspective.

Thanks be to God for meeting a brother in faith like him.


Monday, August 18, 2014

August Focus for Optix and Mix - A Photo and A Portrait

My August organizer is designed with quotes that really inspires.  Here's what is written on top:


"Life is like a camera, FOCUS on what's important, CAPTURE the good time, DEVELOP from the negatives and if it goes wrong take another SHOT."

So for todays photo, I wish to feature one shot I have taken while doing a Photowalk in Intramuros, Manila last June 2014.  The way the cat looked at me is very penetrating.  In capturing animals or people, the eye is a very good center for your subject.  Although this model is just a simple stray cat, yet still as I may say, the photo jumped out of the paper.
  
Title:  The Keen Eye

    
As for the drawing picture, I give you a sketch of my friend.  And here's another quote taken from my August calendar:
"It's not what happens to you, but how you react to it that matters. - Epictetus"
 Title of Drawing:  Seated Lady

This drawing is supposed to work as a reference for an oil painting.  But until now, I haven't touch the canvas where I started putting paint on.  I have to find the inspiration to work on this one.

Have a great week ahead!  Keep on checking this blog and check out for free sketches that I am going to give away every other Friday!

Saturday, August 16, 2014

The Fisher of Men

Finally, I finished my presentation and what remains is to review it so I will have it by heart.  Now, it's time to do my actual duties... the real reason why I was able to get life... work... happiness... strength... trials that groom me... and other blessings from my Creator.  It's about time to thank the real source of all that I have... and all that I am...

This drawing which I have drawn in a hotel in Davao on January 11, 2013 reflects what I aspire to be... to help in the propagation... to be of assistance in my ministry...


So this day, let me say...

Thanks be to God for each brand new day.
Thanks be to God for the roles I play.
Thanks be to God, how can I repay?
Thanks be to God, help me as I walk in Your ways.

Tuesday, July 22, 2014

Child at Play Series


Pencil Color on Paper
8.5 X 14
Sept. 11, 2013

This work is one of my favorites.  I have awarded this to a friend who's already in Vietnam.  It took me 3 hours to finish this.  It was through this drawing that I discovered the characteristics of drawing pencils.  The one that I was using is Castell-Faber coloured pencil.  It was frustrating at first that I wasn't able to make the colors vivid.  Then I accidentally placed one colored pencil in my mouth while thinking, and had wet the tip of the colored pencil.  When I put it down on the paper, the led became softer and the vividness of the color that I was looking for came alive.  I immediately looked at the pencil's box and found out that the colored pencil was water-based.  From then on, I get water and dip the pencil's led on it when I do the final touches.

My reference for this artwork was a picture of a Vietnamese kid playing on a hammock.  Her face is sweet and she seems so happy and untouched.  That's why I had the photo downloaded and had it printed.  While drawing, I captured the facial expression but changed the way it looked.  Thus, if you'll see the original photo, you would know that it's very far from what the kid looks like.  The kid was darker and this drawing is paler.  Nonetheless, I am happy with the output.  

Have you noticed the blending of colors?  If you have any comments about this drawing, please feel free to do so.  I will take it as a constructive criticism.  Thanks for reading.


My Pretty Niece Elize


My Elize

Charcoal on Paper
Size 8.5" X 14"

This artwork was done in 2012.  We still have it in our living room, hanging among our family pictures.  When I did this, I am just going back how to draw using charcoal pencils.  I selected a photo that is dramatic, although the copy was faint, getting the feel of her meak and innocent appearance was what attracted me in making this a subject.

Looking at it, now in 2020, I noticed some flaws from this work.  But I would not want to change it, because it shows me how far I have gone in terms of my skills in drawing and portraiture.  One I can point clearly is how I drew her eyes.  The left eye looked imbalanced and doesn't have depth.  Also, the shadows on the right of the face are still lacking.  I haven't drawn well the clothing or t-shirt, thus making the portrait look pale.  Nevertheless, I am still happy looking at this piece.

This drawing is one of my very first and few that I signed with my personal nickname -  the name my family and close relatives call me when I'm still young.  Now, I sign all my works with Rose Gob.


About Rose Gob

My photo
Hello! Thank you for reading my blog. I am Rose Gob, a Knowledge Management expert, a seasoned HR and OD practitioner, an artist and an educator by heart. I have created three (3) blogs to share articles in the field of creative arts, cooperative, social enterprise industry. But among these blogs, I write more for my art blog, www.cascadeartstudio.com. During the pandemic, I was able to populate my blogs with various topics. But now, I realized that I need to focus. I hope you will give me feedback for topics that you want to learn. Send me questions and I'll try my best to answer your questions. Again, thank you for reading and please do check my blogs often. Have a great day!