CASCADE - Creative Arts School for Children and Adults Deserving Excellence. Our objectives are to share ARTS, and democratize art education by providing free or affordable knowledge resource on this field.
It was a privilege to be part of the 2nd show of "Pakigangay" at The Blanco Art Gallery. “PAKIG-ANGAY 2: in the Province of Rizal” is a joint exhibit of ARTipolo Group, Inc. of Antipolo, Rizal and BAGHID Eastern Visayas Young Artists Association of Calbayog, Samar, September 01 - 30, 2022.
Pakigangay stands for interdependence or sharing. The theme fits well the cooperation of three groups as we hold this meaningful event. It shows how we embraces fellow artists belonging to BAGHID, ARTipolo and with the support of TBAG.
Prior to the event opening, ARTipolo sponsored youths of BAGHID, to have a lakbay-aral sort of exposure to the different galleries and art exhibits around Rizal provinces. ARTipolo seasoned artists also held some workshops and art camp for the youths of Samar. They had a meaningful and insightful experiences.
The Blanco Art Gallery also showcased some of the works of BAGHID, along with entries of ARTipolo group. The opening cited the contributions of each group and awarded the youth representatives of BAGHID certificates of appreciation. There were small group contest as well, and the event became a celebration of each groups' artistry.
My entry to the said exhibit is the flying lady, which hold a golden apple as she goes after the flying leaves of the holy scriptures. I entitled the said work "Palabras del Oro", which means Golden Words. It's size is 24 inches by 18 inches. It shows how one escapes the pull of worldly pleasures that soon becomes causes of worries and stress. Through the scriptures she finds freedom and comfort.
Please see the rest of the exhibit at TBAG Gallery 3, The Blanco Art Gallery (part of the Blanco Family Museum) #312-B A. Ibañez St., Brgy. San Vicente, Angono, Rizal, Philippines.
We had a three-day vacation last Saturday until Monday (August 27 to 29, 2022). We went to a place where there's no data or wifi, and the cottage that we rented have no TV programs. What we have are open cabanas, videoke, and a large pool. We indeed enjoyed our stay and was able to relax because there's no internet that would occupy us, so we spent so much time bonding with family members.
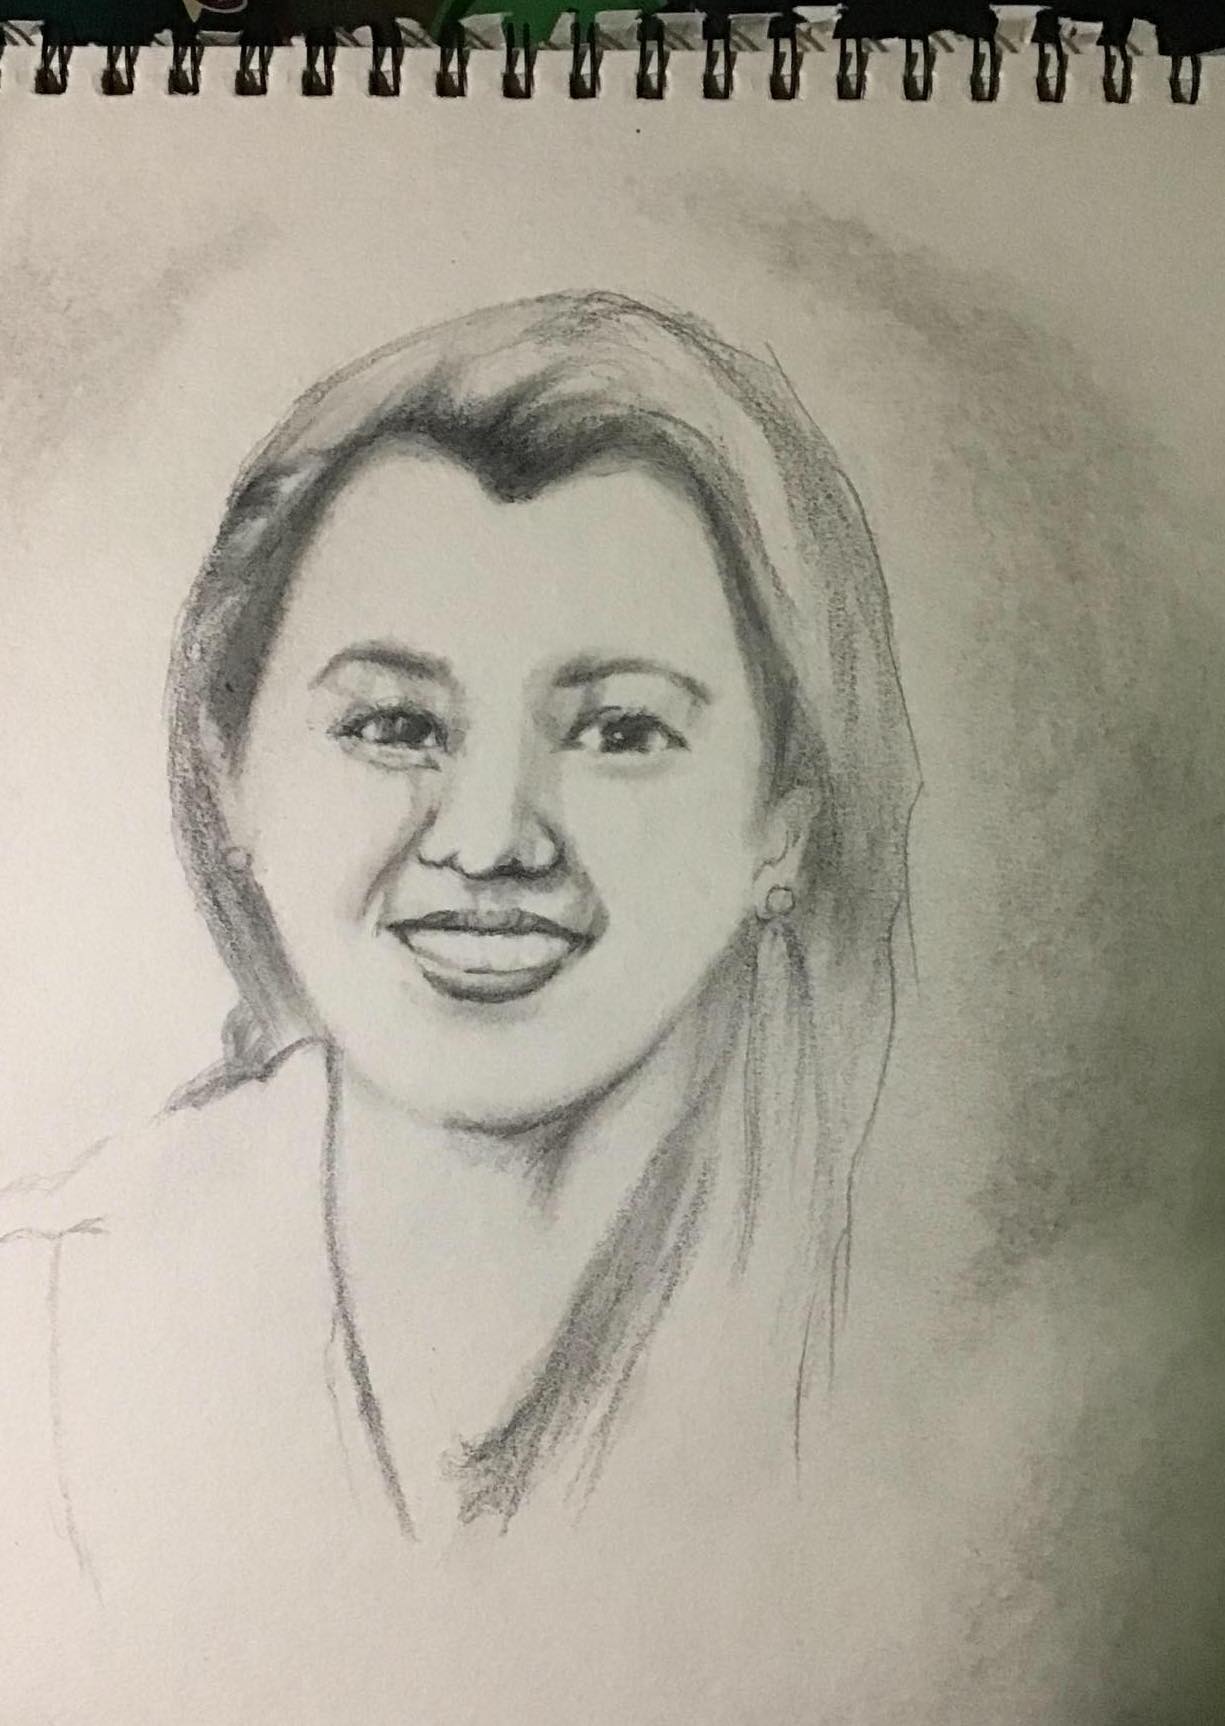
This was my output during the said outing
Whenever I don't feel like swimming, I spent time doing freehand drawing. And so our topic for today, is how you can draw a portrait, without having rulers, or grid lines but just a reference. This approach is a freehand drawing. Usually, if there are no scales, it is quite difficult to find where to place the parts of a face. But with this simple guide of using circles, and shapes, you'll find it easy to draw faces.
I have included a video at the latter part of this article. I promised the video owner, https://www.youtube.com/c/ChommangDrawing, that I'll acknowledge him. Check out his channel and you'll get useful tutorials on drawing.
STEP-BY-STEP INSTRUCTION ON DRAWING FACES
This will be our reference photo:
Step 1: First, draw a circle, which is our guide for the upper portion of the face. If you will visualize a skull, the upper part of the head is spherical in shape.
Step 2: Now find the location of eyes, nose and lips. Cut horizontally the circle by placing a very light line. This will be the upper lid of the eyes or where you place the brows. If your reference picture is looking sideways, about 45 degrees, then the vertical line guide for the nose would be about 1/3 of the circle. Draw two smaller circles for the eyes socket and a slim pear-shaped for the nose. Take note, the end of the nose may be very close to the lower outline of the circle.
Draw the lower shape of the face, which is the chin. The mid line of this shape would be the place for the mouth. Draw a line at the mouth's opening, and the upper lip and lower lip to follow.
You may now proceed with erasing some parts of the head that you feel is not needed; determine now the exact shape of the face by outlining with heavier marks.
Since one ear is showing, draw its outline. Usually, the upper part of the ear starts under the brows and ends at the end of the nose.
Step 3: Proceed with detailing. Draw the eyes as to how you see it. Followed by the nose and lips. If you are distracted with the references, you can erase it as soon as you are able to achieve the exact shapes and details of the face.
It is not necessary that you follow the guidelines as you draw. If you feel that there are slight changes to make it look exactly as the photo, do change the parts. It is advisable that you draw using light stroke first before you finalized the lines or parts of your drawing.
For the hair, find the center where the hair parted. Usually, the hair flows out of the sphere borders. Use curves as to how the hair flows out. Do not shade it yet.
When you are able to fine the details, you may now use darker and heavier strokes for finishing the face outlines.
Step 4: Shading - Now that you see how the face appears, erase all sketches or guides and clean up the face. Then shades the eyes, lips, hair and other shadows. Get the exact hue of shades so as to develop a 3D appearance or to put life to your drawing. Highlights can be achieved by lifting out shades using your eraser.
Watch the video below to see how it's being done by the artist. We hope you learned from this free tutorial. Please like or follow and share to your friends.
Hello! Thank you for reading my blog. I am Rose Gob, a Knowledge Management expert, a seasoned HR and OD practitioner, an artist and an educator by heart. I have created three (3) blogs to share articles in the field of creative arts, cooperative, social enterprise industry. But among these blogs, I write more for my art blog, www.cascadeartstudio.com. During the pandemic, I was able to populate my blogs with various topics. But now, I realized that I need to focus. I hope you will give me feedback for topics that you want to learn. Send me questions and I'll try my best to answer your questions. Again, thank you for reading and please do check my blogs often. Have a great day!

.jpg)


 Step 1: First, draw a circle, which is our guide for the upper portion of the face. If you will visualize a skull, the upper part of the head is spherical in shape.
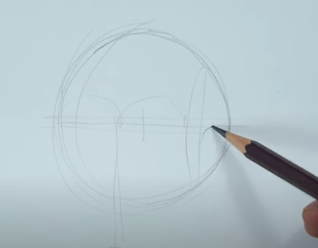


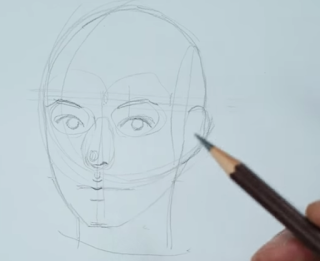 Since one ear is showing, draw its outline. Usually, the upper part of the ear starts under the brows and ends at the end of the nose.
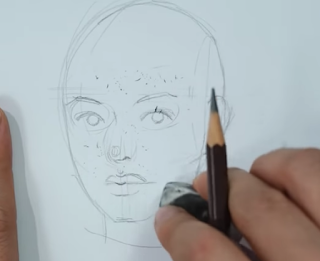 It is not necessary that you follow the guidelines as you draw. If you feel that there are slight changes to make it look exactly as the photo, do change the parts. It is advisable that you draw using light stroke first before you finalized the lines or parts of your drawing.
 For the hair, find the center where the hair parted. Usually, the hair flows out of the sphere borders. Use curves as to how the hair flows out. Do not shade it yet.
 When you are able to fine the details, you may now use darker and heavier strokes for finishing the face outlines.