Tuesday, August 30, 2022

FREE ART LESSON #7: Portraiture or drawing faces: Freehand Drawing (Simple and Easy to follow steps)

 We had a three-day vacation last Saturday until Monday (August 27 to 29, 2022).  We went to a place where there's no data or wifi, and the cottage that we rented have no TV programs.  What we have are open cabanas, videoke, and a large pool.  We indeed enjoyed our stay and was able to relax because there's no internet that would occupy us, so we spent so much time bonding with family members.

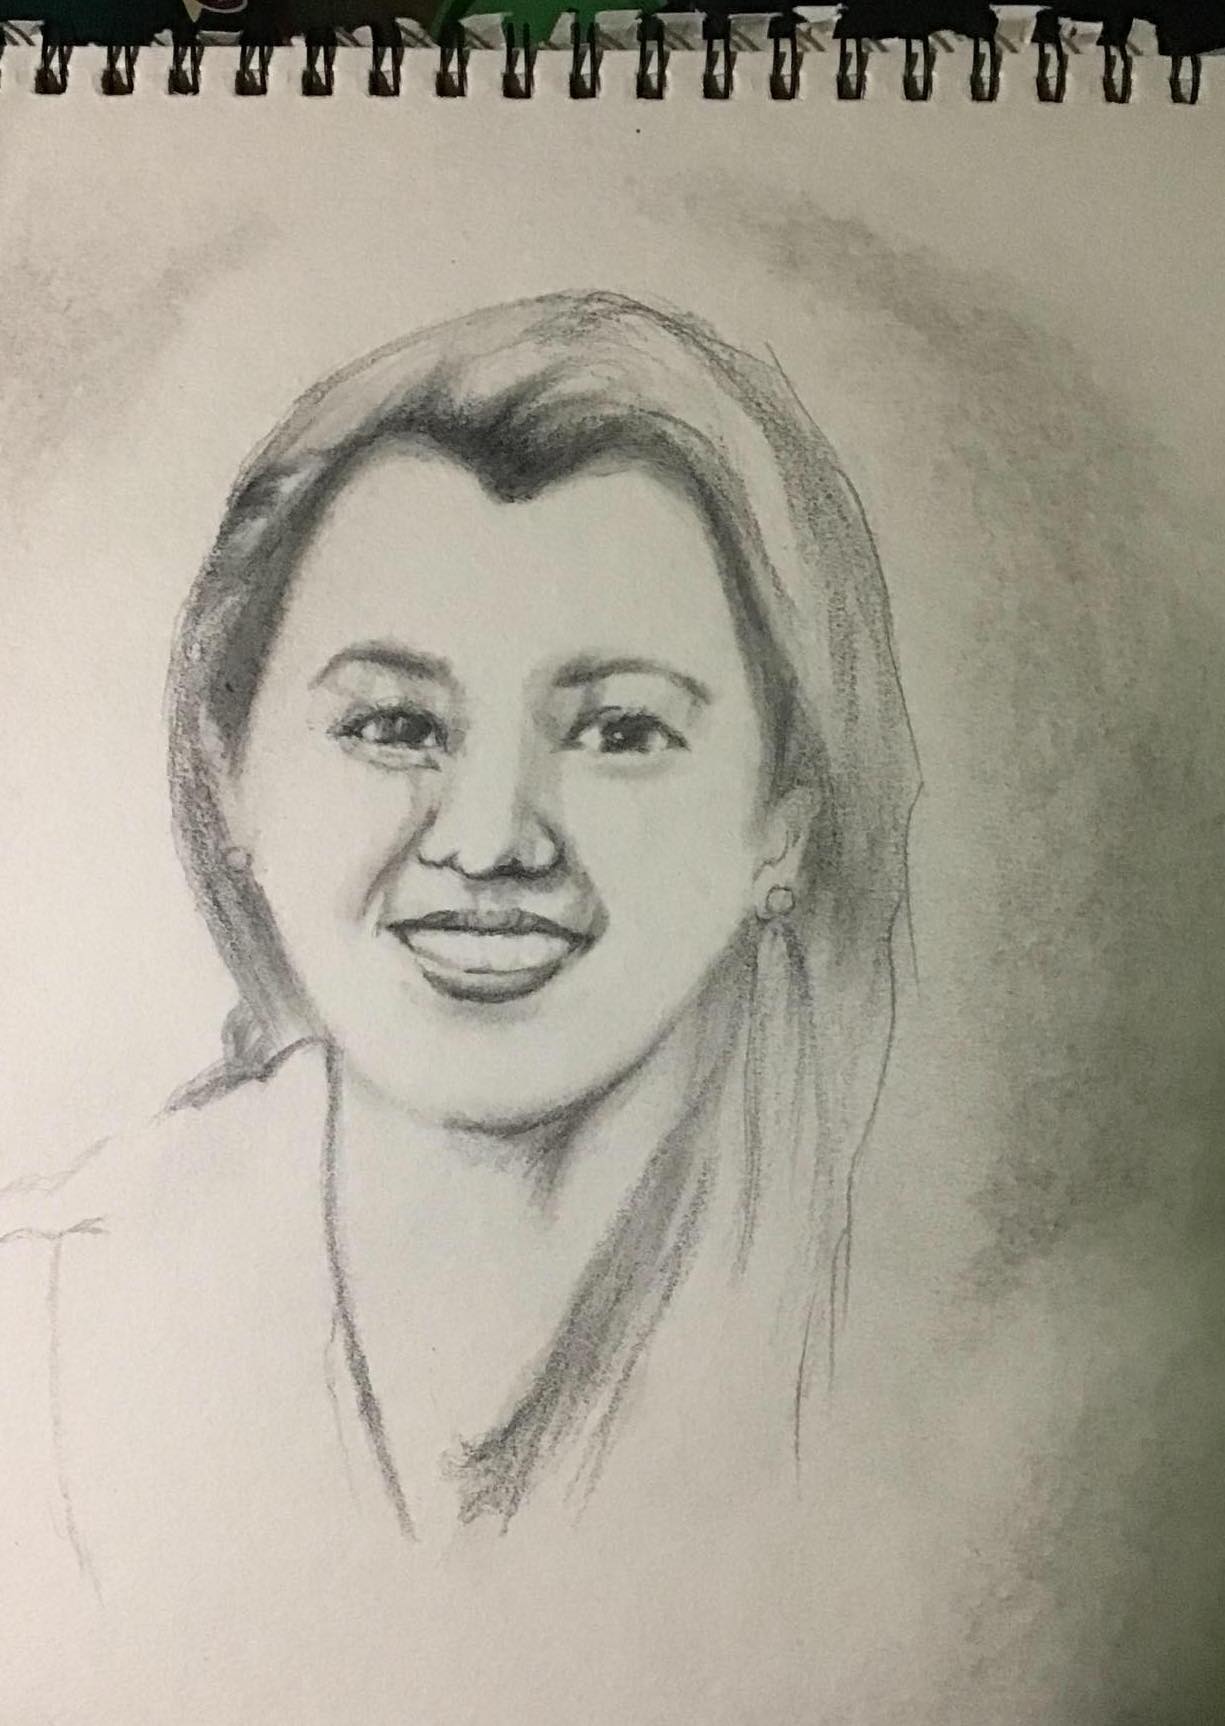
This was my output during the said outing

Whenever I don't feel like swimming, I spent time doing freehand drawing.  And so our topic for today, is how you can draw a portrait, without having rulers, or grid lines but just a reference.  This approach is a freehand drawing.  Usually, if there are no scales, it is quite difficult to find where to place the parts of a face.  But with this simple guide of using circles, and shapes, you'll find it easy to draw faces.  


I have included a video at the latter part of this article.  I promised the video owner, https://www.youtube.com/c/ChommangDrawing, that I'll acknowledge him.  Check out his channel and you'll get useful tutorials on drawing.

STEP-BY-STEP INSTRUCTION ON DRAWING FACES

This will be our reference photo:


   Step 1:  First, draw a circle, which is our guide for the upper portion of the face.  If you will visualize a skull, the upper part of the head is spherical in shape. 


 Step 2:  Now find the location of eyes, nose and lips.  Cut horizontally the circle by placing a very light line.  This will be the upper lid of the eyes or where you place the brows.  If your reference picture is looking sideways, about 45 degrees, then the vertical line guide for the nose would be about 1/3 of the circle.  Draw two smaller circles for the eyes socket and a slim pear-shaped for the nose.  Take note, the end of the nose may be very close to the lower outline of the circle. 


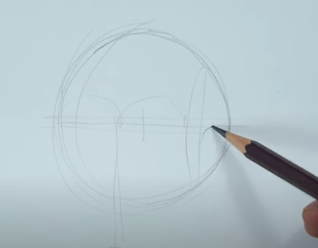
Draw the lower shape of the face, which is the chin.  The mid line of this shape would be the place for the mouth.  Draw a line at the mouth's opening, and the upper lip and lower lip to follow.  

You may now proceed with erasing some parts of the head that you feel is not needed; determine now the exact shape of the face by outlining with heavier marks.
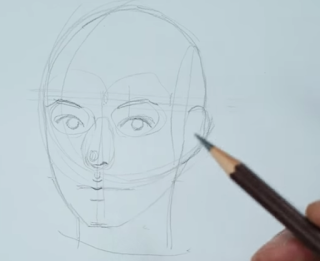
 Since one ear is showing, draw its outline.  Usually, the upper part of the ear starts under the brows and ends at the end of the nose.


Step 3:  Proceed with detailing.  Draw the eyes as to how you see it.  Followed by the nose and lips.  If you are distracted with the references, you can erase it as soon as you are able to achieve the exact shapes and details of the face.


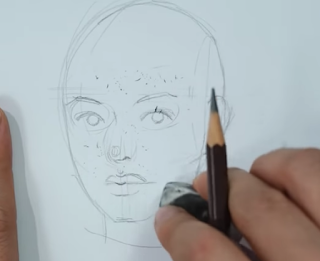
 It is not necessary that you follow the guidelines as you draw.  If you feel that there are slight changes to make it look exactly as the photo, do change the parts.  It is advisable that you draw using light stroke first before you finalized the lines or parts of your drawing.

 For the hair, find the center where the hair parted.  Usually, the hair flows out of the sphere borders.  Use curves as to how the hair flows out.  Do not shade it yet.

 When you are able to fine the details, you may now use darker and heavier strokes for finishing the face outlines.


Step 4:  Shading - Now that you see how the face appears, erase all sketches or guides and clean up the face.  Then shades the eyes, lips, hair and other shadows.  Get the exact hue of shades so as to develop a 3D appearance or to put life to your drawing.  Highlights can be achieved by lifting out shades using your eraser.


Watch the video below to see how it's being done by the artist.  We hope you learned from this free tutorial.  Please like or follow and share to your friends.  


Thursday, July 21, 2022

Free Art Lessons #6: How to do Charcoal Portraits?

 I have visited my uncle's wake and I was reunited with my cousins.  As we did some catching up with one another, I shared my blog.  It was great to hear encouragement from families.  Along our journey as artist or learning to become one, we may encounter challenges which may bring your enthusiasm down.  Don't be!  Find friends and family members to share your passion for arts.

When I arrived home, I searched for raw materials that I have edited and worked on it.  So here goes our free lesson on art -- How to make charcoal portraits?

Here are the materials that you will need:

  • Granite pencil (HB or even ordinary pencils will do)
  • Drawing paper (The thicker one. I uses a sketch pad 160 g/m2
  • Charcoal pencils
  • Sand paper
  • Kneaded eraser
  • Dry brush with medium soft bristles
  • Paper Stump Spreader

Step 1.  In the following video, you will see that I already made a sketch using granite pencil.  Start drawing first the feature of the face as have been taught on previous topics. 

Step 2.  When you already have a sketch of the face, we will proceed with shadowing using the paper stump spreader and a powdered charcoal pencil.  First, prepare the powdered charcoal.  Get a sand paper and rub on it the lead of the charcoal pencil.  You don't need to transfer the powder on new containers.  What I do is once there's enough powder on the sandpaper, you may start shadowing by dipping your paper stump on the powder lightly.

Step 3.  With light pressure, you may start spreading the charcoal using the paper stump spreader. My tip is that you start with the main features like the eyebrows, eyes, nose, and lips, then work your way out to the shape of the face.  Don't start with the hair yet because it will need a lot of charcoal and you may mess up your drawing as the charcoal sticks to the palm of your hands.

Step 4.  For the lighter parts of the face, use dry brush to spread charcoal coming from what you have placed on the drawing.  I don't dip my brush on the powder charcoal.  I just use it to spread what has been placed on the paper.

Step 5.  For highlights, use your kneaded eraser to lift off some lead from the drawing.  You can shape your kneaded eraser to create finer details.  Do not rub heavily so as not to destroy the paper.


Step 6.  For wider parts and less detailed parts of your portrait, you may use your fingers to spread the charcoal.  Do it lightly and do not rub it heavily on the paper.  Also, make sure that your hands are clean and free of oil or water.

Step 7.  For the final details, for parts that must be well defined, you may use your sharpened charcoal pencil to draw over finer lines i.e. lashes or nose line.

Watch the video above for the demo.  It is in Filipino but there's an English subtitle.  

If you liked this article, please like or share to your friends and families.  Or if it is not of much trouble, please like my youtube channel.  You may also send your comments in the comment section or send me your request for more featured art tutorials or art lessons.  


Have a great day!


About Rose Gob

My photo
Hello! Thank you for reading my blog. I am Rose Gob, a Knowledge Management expert, a seasoned HR and OD practitioner, an artist and an educator by heart. I have created three (3) blogs to share articles in the field of creative arts, cooperative, social enterprise industry. But among these blogs, I write more for my art blog, www.cascadeartstudio.com. During the pandemic, I was able to populate my blogs with various topics. But now, I realized that I need to focus. I hope you will give me feedback for topics that you want to learn. Send me questions and I'll try my best to answer your questions. Again, thank you for reading and please do check my blogs often. Have a great day!